**What is Wiring**
Wiring refers to the process of connecting electronic components through wires. It involves routing and placing wires through holes that correspond to the pins of the components, allowing them to be electrically connected while soldering. This method ensures a secure and organized connection between parts, especially when working with complex circuits or densely packed boards.
**Wiring Skills**
When building a single-chip microcontroller experimental board, it's common to wire a 4-digit digital tube by connecting its first pin to an I/O port. However, due to the small spacing between pins, this can be quite challenging for beginners. In one instance, the digital tube was first soldered onto the board, followed by the wiring on 12 pins. This approach proved inefficient, as both soldering and wiring were time-consuming and prone to errors. After some reflection, it became clear that wiring and soldering components in a more systematic way—starting with the wires before soldering the components—could significantly simplify the process and improve efficiency.
**Wiring Specific Operation**
The process begins by threading wires through the holes where the pins are located. This allows for a direct electrical connection while soldering the components. For boards with many small-pinned components, such as digital tubes, it’s essential to route the wires first before soldering. Otherwise, soldering wires onto tightly packed pins becomes very difficult. To do this, you can thread the wires through the holes on the universal board and fix them in place using spot solder at other points. Using thin copper wire is ideal, as it is easier to handle and provides better flexibility. Once the wires are in place, the components can be inserted and soldered directly to the pins.
**PCB Layout Principles**
- High-frequency digital circuits should have shorter and thinner traces to reduce signal interference.
- High-current and high-voltage signals must be separated from low-level signals. The isolation distance depends on the voltage rating; for example, 2mm is typically used for 2kV, and the distance increases proportionally for higher voltages.
- When routing two layers, conductors should be perpendicular, slanted, or curved rather than parallel to minimize parasitic coupling. Input and output lines should also avoid being parallel to each other. A ground line should be placed between them to prevent feedback.
- Avoid sharp 90-degree corners. If unavoidable, keep them minimal.
- For address or data lines, the trace lengths should be as equal as possible to prevent timing issues.
- Traces should be routed on the top (soldering) side, especially for through-hole PCBs.
- Use fewer vias and jumpers where possible.
- Ensure that pads on single-layer boards are large enough, with thick connecting lines and teardrop shapes to improve reliability during soldering.
- Large copper areas should be meshed to prevent voids during wave soldering and thermal stress.
- Avoid placing components or traces too close to the edges, as they may break under stress.
- Consider production, testing, and maintenance convenience during layout.
Ground noise is a critical issue in analog circuits. Even small amounts of noise can cause significant problems, especially in power amplifiers or high-precision ADC circuits. To mitigate this, place decoupling capacitors at the four corners of the board, connect one end to the ground and the other to a mounting hole grounded via a screw. This helps stabilize the system and reduces noise.
Electromagnetic compatibility (EMC) is increasingly important in modern electronics. Common sources of EMI include signal sources, radiation, and transmission lines. Crystal oscillators, for example, generate strong harmonics that can interfere with other components. To control this, use shielding, grounding, and special filter circuits.
Serpentine routing is often used for high-speed signals like clock lines. It serves two purposes: impedance matching and filtering. In some cases, such as in Intel Hub architecture, signals must be matched precisely to avoid timing issues. Serpentine routing is the only solution in these scenarios. On standard PCBs, serpentine traces can also act as inductors or antenna coils.
**PCB Wiring Tips**
1. **Power and Ground Handling**
Proper handling of power and ground lines is crucial in PCB design. Minimize noise interference to ensure product quality. Key rules include:
- Add decoupling capacitors between power and ground.
- Widen power and ground lines, with the ground line usually wider than the power line.
- Use large copper areas for ground, and connect unused regions to ground.
- In multi-layer boards, dedicate layers to power and ground.
2. **Rule Checking**
After completing the wiring, check the following:
- Are the distances between wires, pads, and vias within acceptable limits?
- Is the power and ground line width appropriate?
- Are critical signal lines properly protected and separated?
- Are digital and analog grounds isolated?
- Do added graphics cause short circuits?
- Are line shapes optimized for performance?
- Are process lines and solder mask sizes correct?
- Are power and ground layers properly managed?
**Co-processing of Digital and Analog Circuits**
Modern PCBs often combine digital and analog circuits. To reduce interference, especially ground noise, separate digital and analog grounds within the board. They should only be connected at a single point, typically at the interface with the outside world. This prevents multiple ground paths and minimizes noise coupling.
**Signal Line on Ground Layer**
In multi-layer boards, signal lines are often routed on ground or power layers. This improves signal integrity and reduces crosstalk. Prioritize the power layer, then the ground, to maintain the board’s structural integrity.
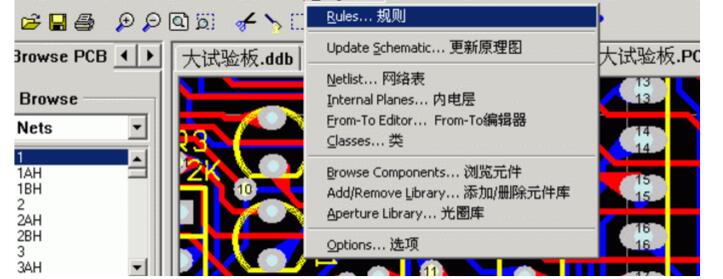
**PCB Automatic Wiring Setup Tutorial**
1. **Accessing the Wiring Rules**
2. **Setting Electrical Clearance**

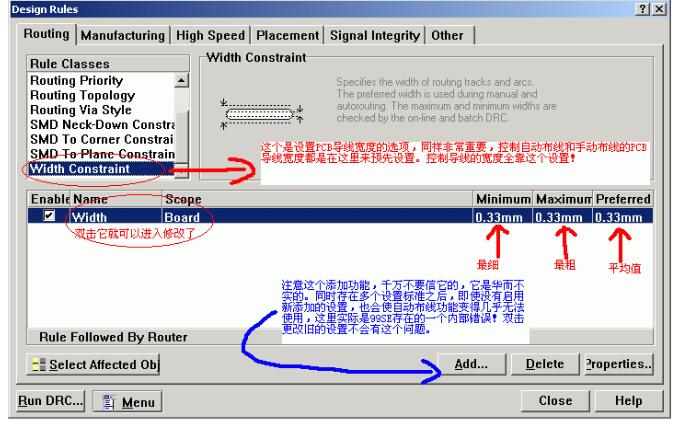
3. **Wire Width Settings**
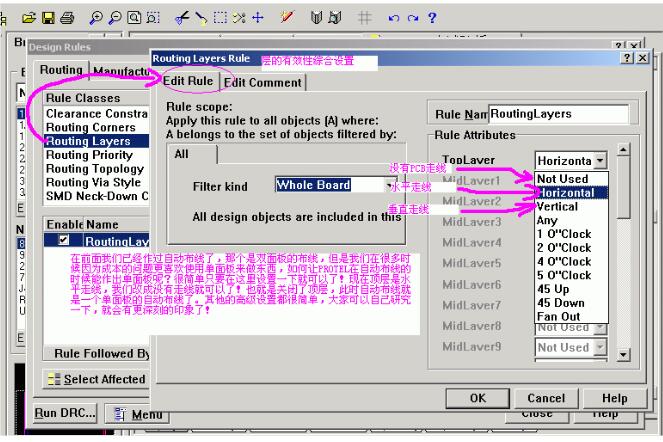
4. **Layer Setup for Single and Multi-layer Boards**
5. **Corner Settings for Wires**
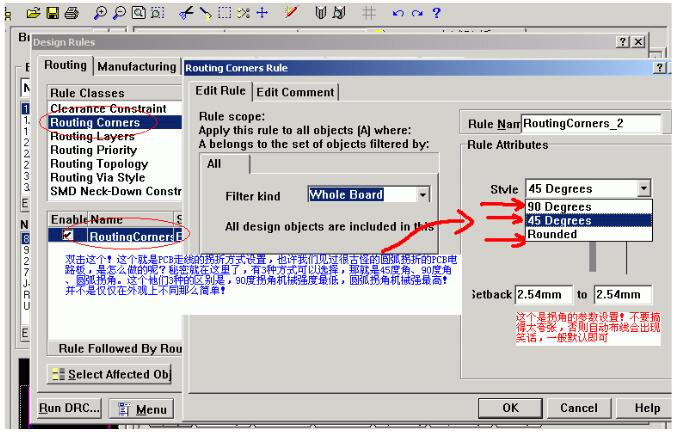
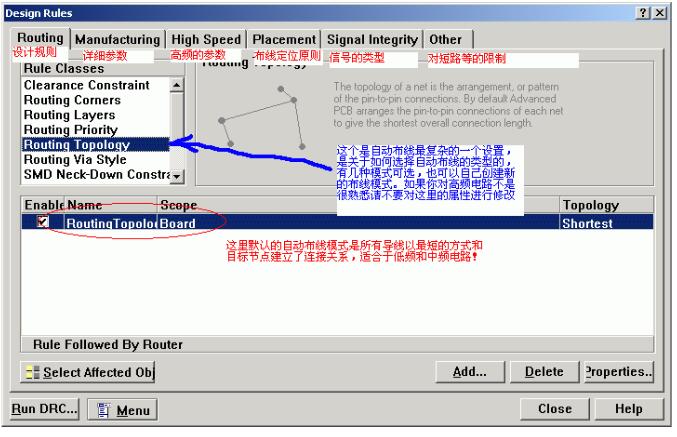
6. **Choosing the Right Wiring Type**
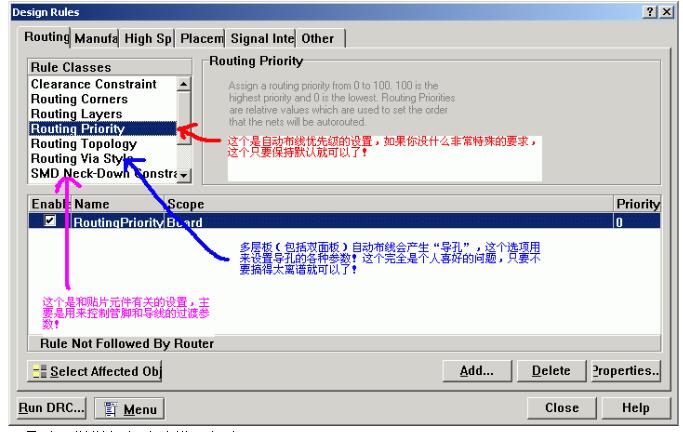
7. **Other Important Settings**
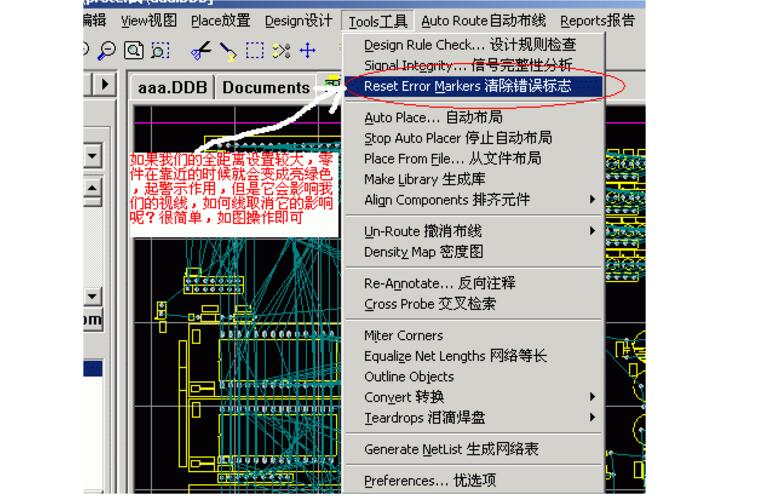
8. **Clearing Errors**
**PCB Wiring Effect**
Proper wiring not only enhances functionality but also improves reliability and performance. Whether designing a simple circuit or a complex multi-layer board, following best practices ensures a clean, efficient, and durable design.
YUOTO THANOS Disposable Vape 5000 Puffs Ecig


YUOTO THANOS Disposable Vape 5000 Puffs
The YUOTO THANOS Disposable Vape is a pre-filled, all-in-one electronic vaporizer device designed for easy and convenient vaping. It boasts an impressive 5000 puff count, making it a long-lasting option for vapers on the go.
Here's a detailed description of the YUOTO THANOS Disposable Vape 5000 Puffs:
Design: The YUOTO THANOS Disposable Vape features a sleek and compact design that fits comfortably in the hand. It has a cylindrical shape with a smooth finish and a mouthpiece at the top for inhaling. The device is lightweight and portable, making it easy to carry in your pocket or bag.
Puff Count: One of the standout features of the YUOTO THANOS Disposable Vape is its high puff count. With 5000 puffs, it offers an extended vaping experience without the need for recharging or refilling. This makes it ideal for vapers who don't want to worry about running out of battery or e-liquid while on the go.
E-liquid Capacity: The YUOTO THANOS Disposable Vape comes pre-filled with e-liquid, eliminating the need for messy refills. It has a generous e-liquid capacity of 8ml, ensuring a sufficient supply of vape juice to last for the entire 5000 puffs. The e-liquid is available in a variety of flavors, giving vapers options to suit their preferences.
Battery: The YUOTO THANOS Disposable Vape is powered by a built-in battery that is designed to last for the entire 5000 puffs. It does not require any charging or replacement of batteries, making it a hassle-free option for vaping on the go. The battery is activated by simply inhaling on the mouthpiece, providing an easy and convenient vaping experience.
Flavor and Nicotine Strength: The YUOTO THANOS Disposable Vape comes in a wide range of flavors, including fruit, menthol, tobacco, and dessert options, catering to different taste preferences. It also offers different nicotine strengths, ranging from 0mg (nicotine-free) to 50mg (high nicotine), allowing vapers to choose the level of nicotine that suits their needs.
Safety Features: The YUOTO THANOS Disposable Vape is designed with various safety features to ensure a reliable and secure vaping experience. It has short-circuit protection, low-voltage protection, and overuse protection, providing a safe and enjoyable vaping experience for users.
Overall, the YUOTO THANOS Disposable Vape 5000 Puffs is a user-friendly and long-lasting option for vapers who are looking for a convenient and hassle-free vaping experience. With its high puff count, pre-filled e-liquid, and built-in battery, it offers a reliable and satisfying vaping experience without the need for recharging or refilling.
Product Highlights:
-
Puffs: 5000 Puffs
-
E-Juice Capacity: 14ml
-
Nicotine strength: 5%
-
Resistance: 1.0ohm
-
Battery Capacity: 650mAh(Rechargeable)
-
Charging: Type-C Charging Port
-
Size: 28.5*24*110.7mm
YUOTO THANOS Disposable Vape ,Yingyuan Vaporizer, Eshisha
Shenzhen Yingyuan Technology Co.,ltd , https://www.yingyuanvape.com